Credit: Shutterstock
There is something special about decorating your home with natural materials, especially when the weather turns chilly and the holiday season starts to approach. A cinnamon stick and dried orange garland is one of those simple DIY projects that makes a room feel warm, cozy, and inviting without requiring expensive decorations or complicated crafting skills.
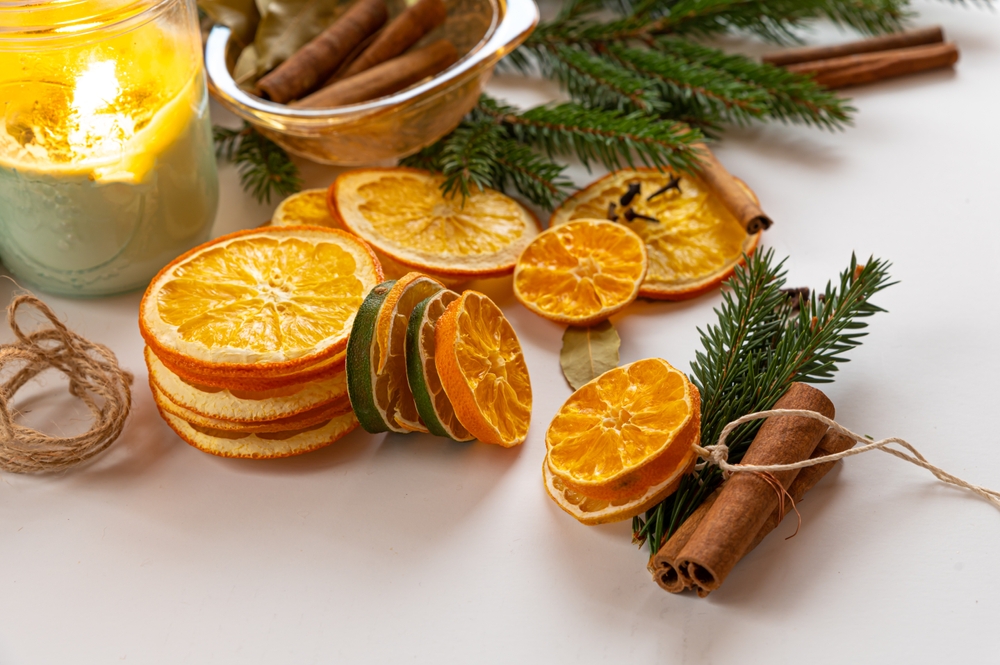
With its golden-orange citrus slices, rustic cinnamon sticks, and natural twine, this garland brings a lovely homemade touch to mantels, stair railings, windows, Christmas trees, and dining tables. Even better, it combines the cheerful look of dried fruit with the familiar, spicy scent of cinnamon.
Whether you are preparing for Christmas, creating seasonal fall decor, or simply looking for a creative weekend activity, this project is easy to customize. You can make it minimalist and rustic or add extra details for a more festive finish.
Why You’ll Love This DIY Garland
This garland is an affordable way to decorate with natural elements you may already have at home. It works beautifully with farmhouse, cottagecore, Scandinavian, and traditional holiday styles.
Here are a few reasons to give it a try:
- Beginner-friendly: You don’t need advanced crafting skills to make it.
- Naturally beautiful: Dried orange slices add warm color, while cinnamon sticks create texture.
- Customizable: Add bay leaves, star anise, wooden beads, or small pinecones to suit your style.
- Reusable: With proper drying and storage, you can bring it out again for future seasons.
- Lovely for gifting: A handmade garland makes a thoughtful addition to a holiday gift basket or hostess present.
Materials You’ll Need
Gather your supplies before getting started. Most are inexpensive and available at grocery stores, craft shops, or online.
- 3–5 oranges, depending on the length of your garland
- 15–25 cinnamon sticks
- Natural jute twine, cotton string, or thin craft cord
- A large needle with an eye wide enough for your twine, or a small hand drill for preparing the oranges
- Scissors
- Baking tray and parchment paper
- Paper towels
- Optional decorations such as dried bay leaves, star anise, wooden beads, or small pinecones
Helpful tip: Choose oranges that feel firm and have relatively smooth skins. Medium-sized oranges are usually easy to slice and look attractive when strung together.
Step 1: Prepare the Oranges
Start by washing and drying the oranges thoroughly. Slice them crosswise into rounds approximately ⅛ to ¼ inch thick. Aim for even slices so they dry at a similar rate.
If the slices are too thick, they may take longer to dry and can retain moisture in the center. Extremely thin slices, on the other hand, can become fragile and tear when threaded.
Lay the slices on paper towels and gently blot both sides to remove excess juice. This small step helps reduce drying time.
Don’t worry if a few slices have uneven edges or different shades of orange. Those natural variations give the finished garland its handmade charm.
Step 2: Dry the Orange Slices
Properly drying the oranges is the most important part of this project. Fruit that remains damp can develop mold during storage, so give yourself enough time to dry it thoroughly.
Oven-drying method
- Preheat your oven to approximately 200°F (95°C).
- Arrange the orange slices in a single layer on a parchment-lined baking tray.
- Place the tray in the oven and dry the slices for around 3–5 hours, turning them every 45–60 minutes.
- Check them regularly, especially toward the end of the drying process.
- Remove the slices when they are dry and leathery, with little to no moisture remaining in the centers.
Drying time varies depending on the thickness of the slices, the amount of juice they contain, and your oven. Some pieces may need longer than others, so remove individual slices as they finish.
If your oven runs hot, lower the temperature slightly and check more frequently to prevent browning or scorching. Keep an eye on the fruit throughout the process.
Air-drying alternative
If you prefer not to use the oven, arrange the slices on a drying rack in a warm, dry, well-ventilated place. Turn them regularly and allow several days for drying, sometimes longer in humid weather.
An electric food dehydrator is another useful option if you already own one. Follow its manufacturer’s guidance for temperature and drying time.
Important: Let the orange slices cool completely before assembling the garland. They should be fully dry, not sticky or moist in the center.
Step 3: Prepare the Cinnamon Sticks
Once your orange slices are ready, sort through the cinnamon sticks and decide how you want to arrange them.
You can use short cinnamon sticks between every orange slice for a balanced pattern, or group two or three sticks together to create fuller sections. Mixing slightly different lengths also adds a natural, relaxed look.
Keep in mind that cinnamon sticks can be brittle. If you want to drill holes through them, work carefully and use appropriate eye protection. In most cases, it is easier to tie the sticks into small bundles with twine rather than drilling through them.
For an extra decorative touch, wrap a little twine around the center of each bundle and leave the ends long enough to tie it securely to the garland.
Step 4: Cut and Arrange the Twine
Decide where you plan to display your garland before cutting the string. Measure the mantel, railing, window, or tree branch, then add around 12–18 inches of extra length for knots and hanging loops.
Lay the twine on a flat surface and arrange the orange slices and cinnamon bundles beside it. This lets you experiment with the pattern before committing to it.
Here are three simple arrangements to consider:
- Classic pattern: Alternate one orange slice with one cinnamon bundle.
- Rustic clusters: Group two orange slices together, followed by two or three cinnamon sticks.
- Natural mix: Add a bay leaf or wooden bead between selected oranges for extra texture.
Leave a little space between each piece if you want a delicate, airy look. For a fuller garland, position the elements closer together.
Step 5: String the Orange Slices and Cinnamon
Now comes the fun part: putting everything together.
Thread your twine through a large needle, then carefully pass it through the flesh near the top of each dried orange slice. Avoid piercing too close to the edge, as the dried fruit can crack or tear.
If the slices are too fragile for threading, make a small hole before drying them or use a tiny hand drill after they have dried completely. Handle them gently and keep the hole away from the outermost edge.
After adding an orange slice, attach a cinnamon bundle by tying it securely to the twine. Continue following your chosen pattern until the garland reaches the desired length.
Keep the pieces secure without pulling the string so tightly that the orange slices bend or break. If you prefer a more flexible arrangement, leave small gaps between each element.
When you reach the end, tie a sturdy loop for hanging. Repeat on the other end if you want the garland to be easy to attach in different places.
Step 6: Add the Finishing Touches
Your garland will already look lovely with just oranges and cinnamon, but a few extra details can make it feel even more special.
Try adding:
- Star anise: Its star-shaped form adds an interesting decorative detail.
- Bay leaves: These provide a muted green contrast against the orange slices.
- Wooden beads: Natural wood tones complement the cinnamon and twine.
- Small pinecones: These work especially well for winter and Christmas displays.
- Cotton ribbon: Tie small bows around selected cinnamon bundles for a softer finish.
Keep the additions lightweight so the garland hangs naturally. If you are aiming for a simple, understated look, two or three decorative elements are often enough.
Where to Display Your Cinnamon and Orange Garland
Once your garland is finished, you can use it in several places around your home.
Across a fireplace mantel: Drape it loosely over the mantel for a warm, rustic look. Pair it with neutral stockings, wooden decorations, or a simple wreath.
On your Christmas tree: Weave the garland between branches for a natural alternative to shiny tinsel. Combine it with warm white lights and wooden ornaments for a coordinated look.
Around a window: Hang it along the top of a window where natural light can highlight the translucent orange slices.
On a staircase railing: Let the garland fall gently along the railing, adding cinnamon bundles and greenery at intervals.
As a dining table decoration: Lay the garland along the center of your table with a few pinecones and decorative candle holders. Keep the dried fruit and twine away from open flames and hot surfaces.
On a gift or seasonal basket: Cut a shorter piece to decorate a wrapped gift, a homemade treat basket, or a seasonal centerpiece.
Tips to Make Your Garland Last Longer
A handmade garland can last beyond one holiday season, but proper drying and storage make a big difference.
- Make sure every slice is completely dry. The center should not feel damp, soft, or sticky.
- Allow extra drying time when needed. If your kitchen or home is humid, the orange slices may take longer to dry.
- Check for moisture before storing. You can leave the cooled slices in a loosely covered container for several days to help identify pieces that are retaining moisture. If condensation appears or the fruit feels damp, dry it further before using it.
- Keep it in a dry location. Avoid steamy bathrooms, damp kitchens, and areas exposed to rain or condensation.
- Store it carefully. After the season, place the garland in a clean, dry box with tissue paper to protect the slices from breaking.
- Inspect it before reuse. Discard any orange slices showing mold or an unusual smell instead of trying to clean and reuse them.
Keep in mind that this is decorative craft material, not food. Do not eat the orange slices after they have been used in a garland.
Common Mistakes to Avoid
Even an easy DIY project can have a few frustrating moments. Here is how to avoid the most common problems.
The orange slices turn brown. Your oven may be too hot, or the slices may have stayed in too long. Use a low temperature and check frequently.
The slices break when threaded. The holes may be too close to the edges, or the fruit may be brittle. Make small holes in the thicker peel near the edge and handle each slice gently.
The garland looks uneven. Try arranging all your materials on a table before threading them. A repeating pattern helps the finished piece look intentional.
The cinnamon sticks keep slipping. Tie them into small bundles and secure those bundles directly to the main twine rather than relying on loose placement.
The garland develops mold. This usually indicates that moisture remained in the fruit or that it was stored in a humid environment. Remove and discard affected pieces, and check the remaining decorations carefully.
A Little Natural Charm for Your Home
Making a cinnamon stick and dried orange garland is a simple way to bring natural color, texture, and seasonal warmth into your home. You do not need expensive supplies or perfect crafting skills; a few oranges, some cinnamon sticks, and a length of twine are enough to create something beautiful.
Take your time drying the slices, experiment with different arrangements, and add your favorite natural details to make the garland feel personal. Whether you hang it across a mantel, weave it through your Christmas tree, or use it to dress up a gift, this handmade decoration adds a cozy touch that store-bought decor often cannot match.
The best part? Every garland will look a little different, and that is exactly what makes it special.